|
Dakota Digital HLY-5000X Digital Speedometer / Tachometer | |
|
I had been wanting to do this mod for about two years before I finally found all the stuff to make it work. | |
|
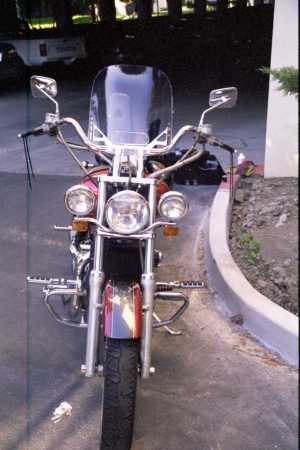
The basic idea was to make the front end look cleaner/sleeker. To
achieve this I wanted to remove the stock speedo, idiot lights and
cowling, add a bigger head light and relocate the speedo to the
bars. The difficulty in this was that the riser spacing is 3 15/16ths inches on center instead of the more common 3 1/2 inches on center. This difference in spacing eliminated almost all the normal handlebar clamp solutions. I found some solutions that would give me a speedo or speedo/tach combination but nothing to replace the idiot lights. So the search went on. |
How it looked stock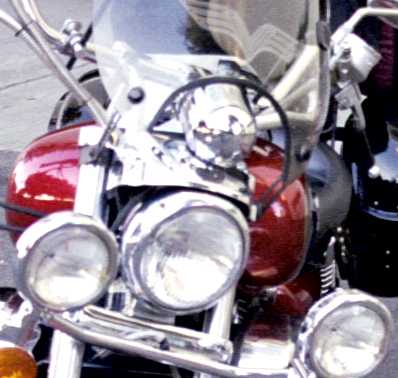
|
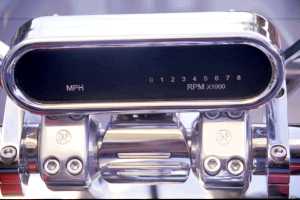
| Then one day I found this little beauty. It has the speedometer, tachometer, high beam, turn signal, neutral indicator and oil pressure warning lights all built into one unit that clamps straight to the bar. It fit the bill perfectly! | |
Front View
 |
Riders View |
|
This modification is not for the faint of heart. If you don't want drill
holes in things, cut wires and chop up cables, stop now and find another
solution. If you're still game, here is how this was done. These instructions apply to installing the HLY-5000X on my 1995 Kawasaki Vulcan 1500 A. Since the unit was designed for use on a Harley-Davidson, it took a little custom hacking to make it work. Your mileage my vary. | |
Parts list
Custom Chrome Springer Head lightPro One Head light mount kit (880550) Dakota Digital HLY-5000X bar mount Digital Speedo/Tach with cable drive sender
Harley Davidson speedo cable.
Shrink tubeing
Variety of wire connectors
Three inches of 1/4 inch diameter rubber hose
Installation
Prep Work- Remove stock headlight.
- Unplug all the wires inside the headlight houseing.
- Remove the headlight housing.
- Remove the speedometer cable from the speedometer and the sending unit on the front wheel.
- Remove the speedometer from its housing and unlplug the wires leading to it.
- Remove the speedometer housing.
- Remove the idiot lights from the bottom of the cowling.
- Remove the cowleing.
- Remove the core from the H.D. speedo cable housing and discard the core.
- Remove the core from the stock housing and sit it aside.
- Determine which end of the H.D. housing fits the sending unit for the new speedo.
- Measure off about 6 inches from that end, and use a hack saw to cut through the housing
- Determine which end of the stock housing used to connect to the stock speedo and remove 6 inches off of this as well
- Thread the stock core into the two pieces of the housings
- Place a piece of shrink tubing over the housing and use it to bind
the two pieces together
- Slit the three inch length of rubber hose down the side and slip it over the joint. This is just to add support to the cable housing
- Set the cable aside for now.
- Place sending unit up under the top tripple tree with the wires pointing forward and the cable connection facing down. The unit will fit right between the two center most bolt holes that were used to hold the old cowleing in place.
- Mount this in place using the original bolts and one of those U shaped bits of hardware that they use to hold electrical coduits in place. Fits perfect!
- Clamp the speedometer to the handle bars per the instructions included with the unit
- Connect the two wires from the sending unit to the two wires on the main unit.
- Cut the connector plug off of the wireing harness that was in the stock head light. Leave a few inches of wire comming out of the plug so you can patch it into the new speedo wires.
- Using the wireing diagram from the service manual and the wireing digram that comes with the unit, wire the speeod wires to the connector plug that you just removed above.
- Plug the two connectors back together again and test that you have the wires for the turn signals and such correct.
- NOTE: this step is easier if you remove the front wheel. Part of this mod was originaly done when I mounted the Show Chrome light bar and is included here just for completeness
- The mounting kit from Pro-One is actually for the Vulcan Classic, not the A model, so the holes are not spaced correctly. But this easy enough to fix with good drill.
- Determine the spacing for the mounting holes, and mark them on the bottom of the tripple clamp
- Drill the holes to fit the mounting bolts.
- Bolt the new headlight mounting post to the mounting bracket.
- Bolt the mounting bracket to the lower tripple clamp
- Connect the headlights power leads to the wireing harness
- Bolt the headlight to the mounting post
- Put the front wheel back on
- Attach the speedo cable to the front wheel, do NOT route it through wire guide in the fender.
- Connect the other end to the sending unit under the top tripper clamp
- The joint in the new cable should fall about where the lower tripper clamp cable recess is located. Route the cable through here and this combined with the rubber hose brace will keep the cable secure and prevent it from flexing. Its also pretty much of of site this way too
- If you have Dyna 2000 ignition module installed, you can connect the tachometer wire on the HLY-5000X to the tach lead on the Dyna 2000. Simply run the wire under the tank down along the frame and hook it up to the yellow tach lead on the D2K. .
You're Done